Instruction booklet SCRUBS
SEW SCRUBS FOR IRELAND
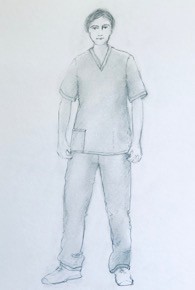
Scrubs are the basic garments worn by medical and administration staff in hospital, clinic and nursing environments.
Thank You for agreeing to sew a set of scrubs. This is a huge help right now as medical staff are experiencing a shortage of these basic protective work garments.
The scrubs consist of two garments – A short sleeved ‘V’ neck tunic and a pair of drawstring trousers. Both have simple patch pockets. The sewing skill level required is basic and can be achieved on any domestic sewing machine.
The scrubs are to be sewn in such a way that they are reversible. This lightens the burden of sorting after laundry.
To achieve this, we recommend a closed-in seaming technique called Lap and Fell. It is not difficult to do, and it ensures a durable, strong finish. A full explanation of this technique is at the end of this document. There is also a good explainer on this YouTube video:
If you are using the paper patterns please follow these instructions.
If you are using your own fabric supply please note the following important information.
The fabric should ideally be a poly-cotton or polyester drill. Pure cotton is also acceptable, but please be aware:
THE FABRIC MUST BE WASHABLE AT 60’ DEGREES.
To Cut The Tunic.
Place pattern piece ‘A’ with the centre-front on the fold of the fabric. Cut 1 x Tunic Front.
Place pattern piece ‘B’ with the centre-back on the fold of the fabric. Cut 1 x Tunic Back
Place pattern piece ‘C’ on straight of fabric. Cut x 2
Place pattern piece ‘D’ on doubled over fabric to cut 2 x sleeves. Cut 2 of pattern piece ‘E’ for the tunic pockets.
To Cut The Trousers.
There is no outside seam. Place the trouser leg pattern piece ‘F’ flat on the fabric. Cut out 2 leg pieces.
Cut
2 Trouser pockets pattern piece ‘G’. You are now ready to sew.
TO SEW THE TROUSERS
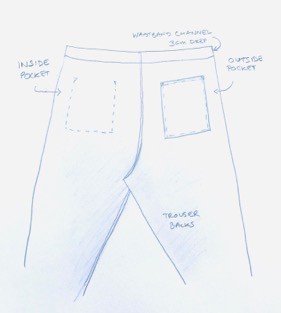
Note: All seam allowances are 1.5cm, apart from the pocket edges which have 1cm seam allowance.
The Lap and Fell (L&F) seam finish is described at the end of this document.
Step 1. Sew the Centre Front crotch seams using the Lap and Fell (L&F) seam finish.
Step 2. Sew the Centre Back Crotch seams using L&F
Step 3. Sew the trouser inside seam using L&F seams. You may find it easiest to start from one side of the crotch and sew down one leg, and then do the other.
Step 4. Hem the trouser ends using cotton tape, for fully reversible finish. Pin tape on the outside along end of trousers. Edge stitch on inner line of tape and press under. Edge stitch on inner line to hem. Note – If tape not available, finish trouser hem by turning edge over 1.5 cm twice.
Step 5. Waist-band. You will be sewing a 3cm deep channel for a drawstring waistband. Put the fusable (iron-on) tape on the inside of waistband either side of the Centre Front seam where your button hole will be.
Step 6. Measure 4.5cms from the top edge and sew two buttonholes left and right of the centre front for the drawstring. The buttonholes should start 1.5cm either side of the centre front and should be about 2cm long.
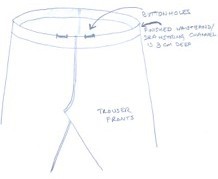
Step 7. Press down waistband 4.5cm, turning 1.5cm under. Stitch along the edge to make the waistband drawstring channel. Open the buttonholes and then thread the drawstring through the channel.
Step 8. Prepare the pockets.
Press under twice the top edge of the pocket and sew.
Press a 1 cm seam allowance under the remaining 3 sides of the pocket piece.
Step 9. Sew the pockets onto the trousers. The position of the pocket is marked on the fabric. Place one pocket on the inside left and one pocket on the outside right.
(Note : If the pocket position is NOT marked on the fabric, align the pocket 6cm from the top edge of the trouser and 6cm from the centre back seam)
TO SEW THE TUNIC
Note: All seam allowances are 1.5cm, apart from the pocket edges which have 1cm seam allowance.
The Lap and Fell (L&F) seam finish is described at the end of this document.
Start by sewing the neckline of the tunic.
Step 1. Prepare the front V collar. The following is a method using tape to seal the seams. However you may wish to sew fully reversible with L&F technique.
Firstly sew a line of stitching 1.5cm in from the front neckline tunic
front, pivoting at the V point. Snip at the V point stopping 1mm before the stitching line. Press front neckline along stitch line.
Now take the 2 collar pieces. With wrong sides together, fold and press neck band pieces lengthwise. Lay the two pieces to create a V shape at the stitch line to join. Stitch a line 1cm along outer edge to mark seam allowance.
Overlap at the base to create the V shape.
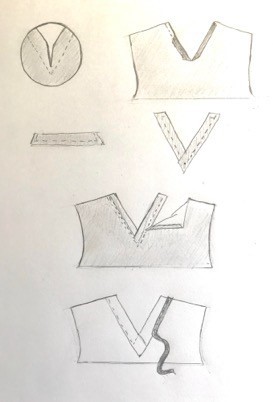
Step 2. Attach to neckline.
Lay the tunic front on top of V neck band, lining the folded edge to the stitch line. Pin and edge stitch, keeping the needle down lift the foot and pivot at v point.
On the wrong side of the garment, align tape with edge stitched line, folding the tape at the V point. Pin and sew two lines of stitching at both edges of tape to finish neckline.
Step 3. Back Neck.
On the tunic back piece. Sew a line 1cm from edge. Snip in to neckline at curve stopping just before this stitchline. Pin and sew tape just inside the stitchline to right side of fabric. Press tape to inside of garment to encase the edge. Finish with two lines of stitching.
Step 4. Prepare the pockets. Press under twice the top edge of the pocket and sew. Press a 1cm seam allowance under the remaining 3 sides of the pocket piece.
Step 5. Attach the tunic front to the tunic back at the shoulders. Sew from the neckline towards the armhole. Use the Lap and Fell (L&F) seaming technique as described at the end of this document.
Step 6. Hem the sleeve ends by turning the edges 1cm twice and top stitch. Attach the sleeves onto the tunic. Use the L&F seam technique.
Step 7. Sew the side seams and the under sleeve seam in one go, using the L&F seam technique.
Step 8. The tunic hem stitching line depth is 2.5cm. Hem the tunic by turning the fabric twice, 1cm and then 2.5cm. Top stitch.
Step 9. Sew the pockets onto the front of the tunic. Place the base of the pocket on the tunic hem. Place one pocket on the inside left and one pocket on the outside right.
Thank-you the
Tunic is now finished.
LAP AND FELL SEWING TECHNIQUE
Lap and Fell is a twice-stitched, enclosed seam. It is commonly found on jeans and sports clothing as it is strong and durable.
Step 1. Stitch a 1.5cm seam with the RIGHT sides of the fabric up. Step 2. Press the seam open.
Step 3. Trim the right side seam allowance down to about 0.5cm Step 4. Press the left seam allowance towards the right.
Step 5. Pin the edge of the left seam allowance under to encase the seam. Top stitch along the very edge.

This
You Tube video is very useful. https://www.youtube.com/watch?v=KQ_JgFXhEaE